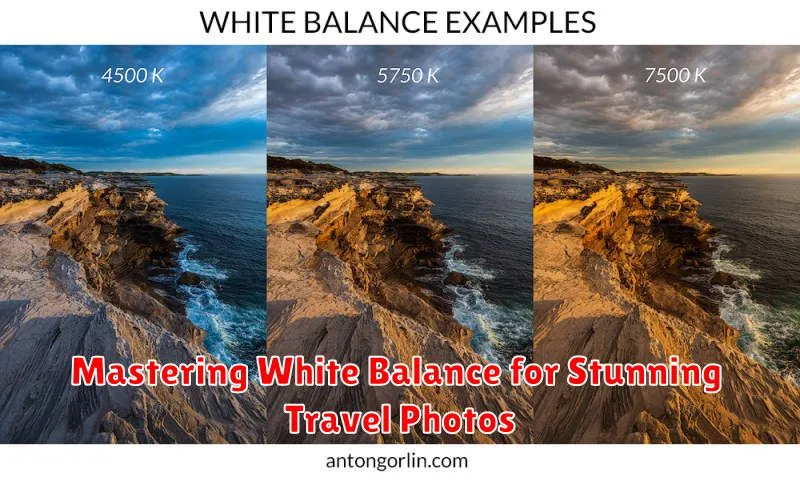
Travel photography is an exciting endeavor that allows you to capture the vibrant colors and essence of different locations around the world. Whether you’re snapping photos of a bustling market in Morocco, the serene beaches of Bali, or the vibrant autumn leaves in Japan, one vital aspect that can make or break your images is white balance. It is an essential photographic element that ensures your photos reflect the true colors of the scene.
Many beginners overlook the importance of white balance and end up with images that feel dull or unnatural. Mastering white balance can transform your photography from merely capturing moments to artfully rendering a scene’s beautiful hues and tones as they appear to the human eye. Understanding this crucial concept can greatly enhance your travel photography and provide your audience with a visual experience that is both accurate and stunning.
Understanding White Balance
White balance is a camera setting that ensures colors in your photos appear accurately by compensating for the color temperature of the light source. Light sources have varying color temperatures, measured in Kelvin (K), affecting how colors are rendered in images. For example, candlelight has a warm color temperature (lower Kelvin), while midday sunlight is cooler (higher Kelvin).
Human eyes naturally adjust to different lighting conditions, perceiving consistent colors regardless of the light source. However, cameras need guidance through white balance settings to mimic this ability. The goal is to capture whites as whites, thus rendering other colors truthfully.
White Balance Modes Explained
Most cameras come equipped with various white balance modes designed to match typical lighting conditions. Understanding these modes will help you choose the best setting for a given situation:
- Auto White Balance (AWB): This mode automatically adjusts the white balance based on the light detected. It’s convenient but might not always provide the most accurate result.
- Daylight/Sunny: Suited for outdoor daylight photography.
- Cloudy: Adds warmth to photos taken under overcast skies, balancing the bluish tint of the clouds.
- Shade: Warmer and redder to compensate for the bluish light in shaded areas.
- Tungsten: Cools down the photo, counteracting the orange hue of incandescent lighting.
- Fluorescent: Adds warmth to offset the blue-green light of fluorescent bulbs.
- Custom: Enables you to set a specific white balance using a white or gray card for accurate results under complex lighting.
Adjusting White Balance in Camera
To adjust white balance effectively, first identify the light source of your scene. Is it natural or artificial? Is it consistent or changing? Based on your observation, select the corresponding white balance mode on your camera. For instance, if you’re photographing a subject in a room lit by tungsten bulbs, choose the Tungsten mode to counterbalance the warm light.
For more control, especially in challenging lighting conditions, you can manually adjust Kelvin settings if your camera allows it. This approach provides greater precision over color adjustments, enabling artistic effects and ensuring that the mood of your shot aligns with your vision.
Correcting White Balance in Post-Processing
Despite best efforts during shooting, sometimes your photos might still require white balance adjustments during post-processing. Software like Adobe Lightroom or Photoshop offers tools for correcting white balance. You can use sliders to adjust warmth and tint, or utilize the white balance eyedropper tool for spot corrections.
Correcting in post-processing allows finer control over the final image. However, be cautious not to overdo it, as excessive adjustments can lead to unrealistic colors. Always aim to achieve a natural look that reflects the scene as it was envisioned.
Common White Balance Challenges
Certain scenarios can test your skills in managing white balance. Mixed lighting situations, such as shooting indoors with windows letting in daylight, can cause mixed color temperatures. Finding a balance between different light sources is key, often requiring custom settings or post-processing tweaks.
Furthermore, exotic locations with unique lighting conditions, like the Northern Lights or neon-lit streets, demand particular attention. Having a sound understanding of your equipment’s capabilities and practicing under various conditions will prepare you to handle these challenges effectively.
Ultimately, mastering white balance can elevate the quality of your travel photography, allowing the beauty of the world to shine in your images as it does in real life.

